FCP FAQ
This is a list of responses to all the most common questions I’ve heard from students and read on forums, in a concertina format — just click a question to read the answer.
I’ll keep growing this over time, but if you have any questions about Final Cut Pro that I haven’t answered here, please post a message to me on Twitter, @funwithstuff.
Help! Something’s not working!
You've probably enabled Background render. This feature is good for complex timelines, but it creates large render files in ProRes 422 format. If your Mac is fast enough to render your timeline in real-time, you can turn this off.
If you do leave Background render turned off (in Preferences, under Playback) you can still render selected parts of the timeline on request:
- Make a selection, with the Select tool or the Range Selection tool.
- Press ⌃R to render the selection.
One other possibility is that you're creating Optimized (ProRes 422) versions of your clips during import, and this probably isn't necessary either. Most Macs can edit most native clips without transcoding to any other format, and Optimized clips are huge. Don't create Optimized clips unless you know you have to, and if you can't edit the native files, consider making Proxy files instead of Optimized. Note that there's an option in Preferences under Playback to "Create optimized media for multicam clips" which you may want to turn off too.
Once you've turned off Background render and confirmed that your Mac doesn't need Optimized media, you can delete unwanted files by selecting your Library, choosing File > Delete Generated Library Files, then checking all the boxes in the dialog that appears.
Type ⌘0 (zero) to choose the Default workspace, and explore Window > Workspaces for other preset options. You can save your own custom workspaces too.
Final Cut Pro periodically takes a backup of each Library you work on. These small date-stamped backups are stored in your home directory, in Movies > Final Cut Backups, and can be accessed with File > Open Library > From Backup.
However, your media is not included in these backups, so always make sure you have a spare copy of the media you shot (or were provided) on a separate drive so you can relink to it if needed.
One good working strategy is to copy your video files to a Library on an external SSD, and back up those video files to a second spare drive. That way, you'll be able to recover from the failure of either your Mac (because you can take the external drive to another Mac) or the external SSD (because you can reunite the Library backups on your Mac with the media backups on the second spare drive).
If Final Cut Pro is crashing, you've probably got a problem with your preferences, with a third-party plug-in, or possibly with a corrupt Library. None of these are common, but you might experience them eventually.
Preferences are easy — throw them away and reset to your previous settings. Plug-ins are a little trickier; you can try disabling plug-ins, or removing them from your timelines, to see if things improve. Most plug-ins are stable, but the more complex a plug-in is, the more likely it'll have issues.
For a corrupt Library, it might be worth making a new Library. Drag your current timeline(s) from your old, unstable Library to the new clean library. If prompted, copy the media too. You may wish to copy across all your old media too, though used media will come across with the timeline. In some circumstances, it can help to make a new timeline, then copy all the contents from your old timeline, and paste them into the new one.
This area can be complex, so try Apple's official advice and FCPX.TV's troubleshooting list too.
FCP works a little differently, but it's much faster once you get used to it. The spine of your edit is the primary storyline, and everything else is connected to it: video above, audio below. If you move or trim a clip on the primary storyline, any clips connected to it will move. Imagine a sound effect connected to a particular point on a video clip — it's going to stay in sync.
But if you don't want it to stay in sync, it doesn't have to. Hold down the ` key (AKA ~) as you move the clip on the primary storyline, and connected clips will stay put. Another option is to press P to move to the Position Tool. In this mode, moving a clip leaves a gap, and dropping it to the primary storyline erases whatever was there, the same way that Premiere works most of the time.
After a while, you'll probably find that you don't need these two solutions as much as you thought you would, but it's good to know they're there.
In general, you'll have best results in most projects if you work with the magnetic timeline and don't try to fight it. However, if you're editing a music video, you might want to put the music on the primary storyline, then connect everything else above it. You can then use connected storylines to keep groups of clips together, enabling rippling and clip reordering away from the primary storyline. There's much more on this in Final Cut Pro Efficient Editing, in Chapters 6 and 7.
Importing and Organizing
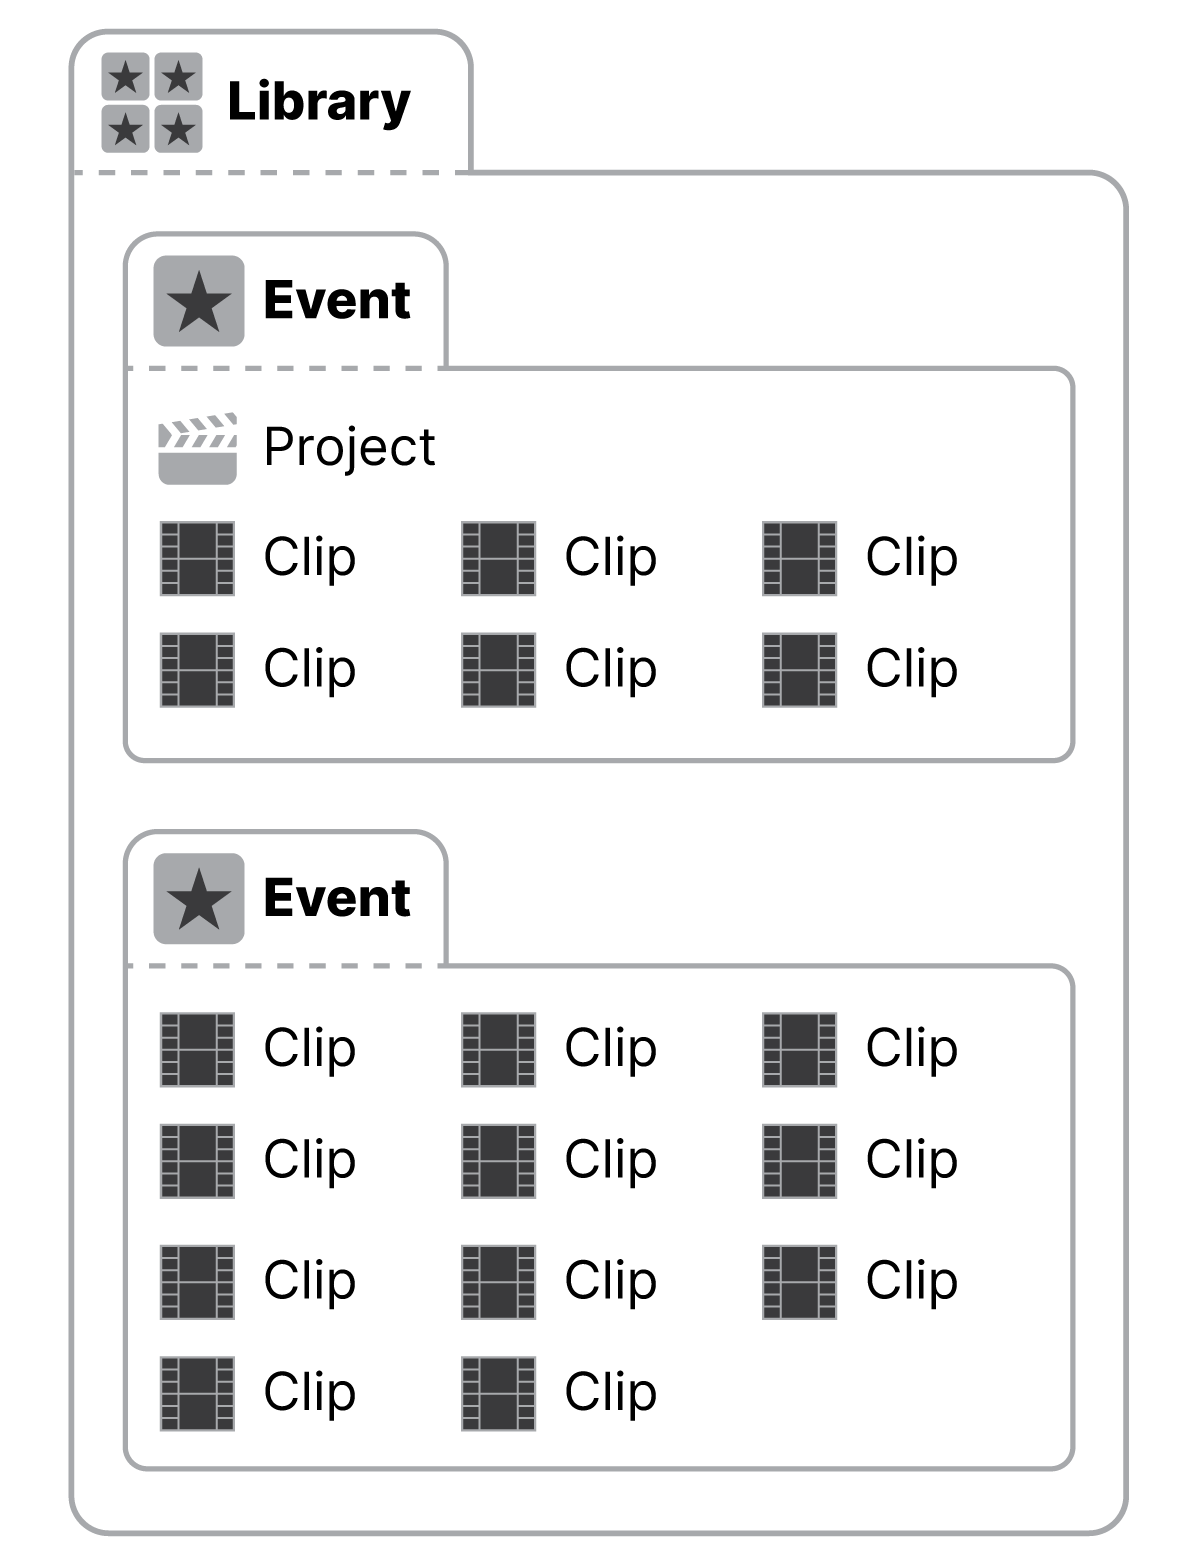
A Library holds one or more Events, and an Event holds Projects and clips.
You should usually make a new Library for each job you might do for a client, and I recommend starting its name with the ISO-standard date format "YYYY-MM" to make everything alphabetize neatly.
Events are like folders; make as many or as few as you want. Simple jobs might need just one, complex jobs might use plenty. Projects are sequences, timelines, or edits.
To avoid any confusion, I avoid the word "project" as much as possible, and I prefer to use the term "timeline" when talking about an edit, and "job" when talking about the overall video task undertaken for a client.
There are a few different ways to work here, but if you're new to the app or to editing, or if you work alone, I recommend storing media inside the Library, because not much can go wrong. You can import directly from an SD card or your iPhone to a Library, and there's no need to copy it to your hard drive first.
If you do copy your media files to a hard drive, or you're editing from files you've been given, you can instead reference external media files, outside of your Library. This keeps your Library size down, because the (large) media files are never added to your Library.
Be careful though, because you now have to remember to move your media and your media-free Library, and you'll probably have to relink your media if you move to a different Mac or a different storage device. If you're comfortable with more advanced workflows like collaboration, you'll want to use external media so you can repeatedly exchange small Libraries.
There's more on this in Final Cut Pro Efficient Editing, in Chapter 3.
Try not to make "stringout" timelines. Instead, first use keywords to organize your clips. Bring up the Keywords window with ⌘K, type keywords in at the top, or expand the window and use the keyword shortcut fields. When you add a keyword, a matching keyword collection is added to that clip's event, and you can see all clips with a certain keyword in each matching keyword collection.
It's much better than folders, because you can use multiple keywords on a single clip, so you can find a clip in multiple places.
Once you've done that, master J/K/L for playback, I and O for marking In and Out, and use F to mark Favorite ranges on the best parts of your clips. It takes a little time, but once you're done, you can instantly see only the best (Favorite) parts of all your clips by choosing "Favorites" from the Clip Filtering menu at the top of the Browser.
Chapters 4 and 5 in Final Cut Pro Efficient Editing cover this process in detail.
Editing techniques
Download the free app CommandPost from commandpost.io. It's an excellent, supported app which allows the use of third-party control surfaces like the excellent Monogram, as well as simple MIDI devices.
With a little configuration, you can hook up a dial or button to control a slider or feature in Final Cut Pro, which can enable much faster workflows than a keyboard with a pointing device.
CommandPost also enables many other kinds of hidden tricks and techniques in Final Cut Pro, and is well worth exploring. Be sure to send the developers a donation if you find it useful.
In general, you should deliver to the requirements, which are likely to be 24, 25 or 29.97fps. If your videos are only going to be seen on the web, there are no special requirements regarding frame rate.
One important consideration is that if you're using a camera on which you cannot control the frame rate, you should probably match that source frame rate in your deliverables. This is less of a problem today, but older iPhones couldn't create 25fps files (today you can activate "Show PAL Formats" in settings) and some cheaper cameras are limited to the main frame rate of the country they're sold in.
There's a further consideration for phones in that you often can't control the shutter speed separate from the frame rate. That's an issue, because if your light source and shutter speed are mismatched, you'll often see banding in the final video. If you're on a phone and shooting indoors, you may wish to use 25fps in PAL countries and 29.97fps in NTSC countries to avoid banding problems, as they're hard to remove later.
Lastly, if you are creating an advertisement, and there's any chance it could be repurposed for broadcast TV or pre-movie cinema distribution, make sure to use the correct frame rate. In PAL countries, that means 25fps, and in NTSC countries, it means 29.97fps for TV or 24fps for cinema. (Cinemas in PAL countries will take 24 and 25fps material for pre-movie ads.)
If you've already chosen one frame rate and want to switch to another, know that you can't change the frame rate of a project which has content inside it. Instead, create a new timeline at the correct frame rate, then copy the contents of your old timeline and paste them into the new one. Some edits will shift a little, so check them.
There's a lot more discussion about banding and camera settings in Final Cut Pro Efficient Editing, in Chapter 2.
Ken Burns has built-in smooth starts and endings, but it's not very controllable, and keyframing can't be make smooth. For the smoothest results, use a third-party effect (built in Motion) to control scale.
One popular free option is Alex4D Smooth Move, which allows for smooth starts and endings, rotation, repositioning during scaling, plus a delayed start or early finish. Note that if you use this on clips that are smaller than the frame size (like a logo in the corner of the screen) you might see cropping if you zoom in (0% to 20%) so use negative numbers instead (e.g. -10% to 0%). While you can't set negative numbers with the sliders, just drag on the numbers next to the sliders instead.
Always ⌥-click on the clip you want to adjust, because this moves the playhead at the same time it selects the clip. This way, you'll never be editing a clip you're not looking at.
Don't detach audio! Instead, expand the audio by double-clicking on the audio waveform, or choosing Edit > Expand Audio. Any edits to the audio will be retained this way, but you won't separate the audio and the video, and you can't send things out of sync. For more, look at p260 in Final Cut Pro Efficient Editing.
With all that said, you can detach the audio if you really need to, using Clip > Detach Audio. A good reason to do this is if you need to cheat an edit, moving the audio and video out of sync.
Select it, then type ⌃D, then the number of frames or a timecode, then press return. From p276 in Final Cut Pro Efficient Editing:
Here are some examples, remembering that you only hold ⌃ while pressing D, and you'll need to press return at the end of each one:
- ⌃D4. = make the selected clip 4 seconds long, an absolute change
- ⌃D+2. = make the selected clip 2 seconds longer, a relative change
- ⌃D1 = make the selected clip 1 frame long — handy for time-lapses or animation sequences
Color Correction
You'll want to begin with shot-to-shot matching, making sure that each shot roughly matches the next in terms of exposure and white balance. Careful shooting makes this much easier, and the Color Balance feature can help too. Manual corrections are easiest with the Color Board or Color Wheels.
After you've got the basics down, add additional color corrections (Color Wheels and many kinds of Curves) to control contrast, selective color corrections, and fancier effects like vignettes, color grading, and tracked color corrections. You might also want to explore adjustment layers to correct entire scenes.
There's a whole lot more about color correction in Chapter 11 of Final Cut Pro Efficient Editing.
Anything you apply to an adjustment layer applies to all the clips beneath it, so you can apply a color correction to adjust an entire scene, or use an effect on an adjustment layer to zoom in everything. Adjustment Layers aren't built-in to Final Cut Pro, but they're free and easy to find with a quick search. Here's one from Ripple Training. (You could also make your own with Motion — it's just a Title with the text removed.)
There is one limitation, which is that when you use an adjustment layer, the source material is downscaled to the resolution of your timeline. Normally this wouldn't be a problem, as the source material will eventually be downscaled to your timeline when exported, but if you use an adjustment layer that has a built-in feature to scale your footage up (a punch-in), you might get a softer result than you might have expected.
To avoid quality loss with adjustment layers, you should work in a timeline that matches the horizontal resolution of your source footage. For example, if you shoot in UHD 4K and want to deliver 1080p, you should work in a UHD 4K timeline. Modern Macs won't have any problem with this. Another good way to work is to use a "plain" adjustment layer and apply a punch-in effect to that adjustment layer.
Note that if you only use adjustment layers for color correction, you shouldn't face any quality problems.
By default, an iPhone shoots in HDR Dolby Vision, and if you add it to an SDR timeline, you’ll see blown-out images. The correct fix is to add an effect, HDR Tools, from the Color category. When applied, choose the “HLG to Rec. 709 SDR” option from its menu in the Inspector.
To make this an easier process in future, it’s best to press the Save Effects Preset button in the Inspector, and make a new Effects Preset with just that HDR Tools effect included. When you’ve done that, right-click the Effects Preset in the Effects pane, and choose “Make Default Video Effect”. Now you can apply it whenever you need by just pressing ⌥E.
Shortcuts
Here's a two-page printable PDF of all the best keyboard shortcuts for FCP, with the same page size as Final Cut Pro Efficient Editing so you can trim it down and keep it inside:
Note that these are all default shortcuts, and you can make your own shortcuts in the Command Editor. Choose Final Cut Pro > Commands > Customize, or press ⌥⌘K.
Some commands, like Apply Color Correction from Previous Clip, aren't in the menus at all, and don't work until you create custom shortcuts for them. Here's an enthusiastic video of mine with instructions.
There are a few keys worth knowing.
Space is play/pause, but to move more quickly, use JKL — J to play backwards, K to pause, and L to play forwards. Repeated presses of J or L increase speed.
↑ and ↓ arrows move to the first frame of the previous or next clip in the timeline, and ← and → arrows move between frames. ⇧← and ⇧→ move ten frames at a time. Hold those down if you want to move more quickly.
Be sure to check out the list of the best keyboard shortcuts in the nearby FAQ here too.
Use the comma and period keys to move a selected clip or edit point by a single frame. Add ⇧ to those keys to move by ten frames. If you also want to select edit points with the keyboard, you can use [ and ] to select nearby out and in points, or \ to select both for a roll operation.
Titles and Text
If you've already created one title, and want to make other titles that look the same, there are a couple of easy solutions.
You could ⌥-drag the first title to make a copy somewhere else, or just copy and paste. That's fine as a first step, but it's not easy to make a change if the client changes their mind about the style.
A better long-term approach is to create a Text Style using the menu at the top of the Text Inspector, where it probably says "Normal". From that menu, choose "Save All Format and Appearance Attributes" and give the style a name. Now, from any title, you can choose a pre-saved style and all your text will match your standard. Text Styles are common to your system, and can be used in any library, so they're a great way to keep your titles consistent over time.
Find out more about titles in Chapter 15 of Final Cut Pro Efficient Editing.
When you design a title for a client, it's a good idea to save a Text Style, using the menu at the top of the Text Inspector. If you've never done this, you can click at the top, where it says Normal, then Save Format Attributes.
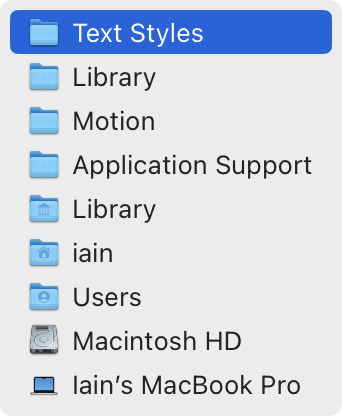
Conversely, if you've done this a number of times over many years, you might want to clean this menu up, but finding where those presets hide isn't so straightforward — they're deep in your Library.
First, Quit FCP. In the Finder, head to your home directory, then press ⌘⇧. (command-shift-period) to show hidden items. (You can repeat this shortcut later to hide hidden items.)
Open Library, then navigate through to Application Support/Motion/Library/Text Styles. Here's the path, in reverse order:
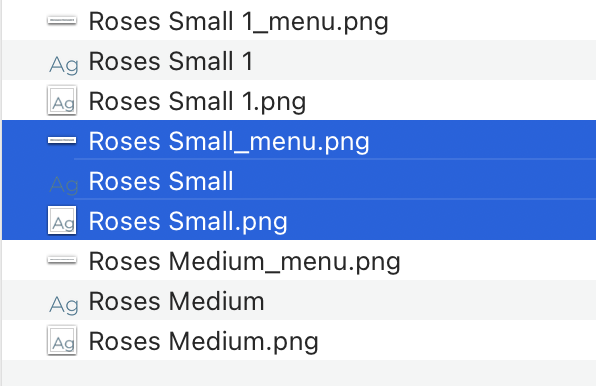
Each Text Style has three files to define it, so delete all three for each entry you want to remove. Here's an example where one of Text Styles is selected:
There are so many great titles out there, from LenoFX, motionVFX, FxFactory, BretFX.com and more, that I don't want to pick just one. I have many banks of titles so I have options to show clients.
Still, I was to choose just one title, it would be the Custom title, built-in to FCP. It's immensely customizable and it's easy to produce great work. Always change the font and tweak a few settings to make a title your own, though.
In Final Cut Pro Efficient Editing, look on p640 for more information.
More information about Final Cut Pro
Head to the fcp.co forums and start there. You can also search "Final Cut Pro" on Facebook to find a number of groups with thousands of helpful people.
Here's the official Final Cut Pro User Guide. Of course, if you're looking for my book, it's available on the home page of this site.
Final Cut Pro is an outright purchase from the Mac App Store (US$299) and is not available on subscription. For Education purchasers, Final Cut Pro is also available in an Education bundle with Motion, Compressor, Logic Pro and LiveStatge.
All updates so far (since the initial release in 2011) have been free.
Updates to Final Cut Pro Efficient Editing are also free, and we're planning to release updates with each major release of FCP. Minor updates to FCP will be covered here on this site. Please note that if you buy the paperback edition, you'll receive an electronic update when a new version of the book is released.
Yes. Because the app wasn't perfect at launch, many existing professionals wrote it off and never looked back; sadly these opinions have stuck around. Today, Final Cut Pro is an excellent tool that's been used to create Oscar-winning short films, full-length features for Netflix, many of the most popular YouTube channels, and everything in between.
For a whole lot more on the launch of Final Cut Pro, watch the excellent film Off The Tracks by Brad Olsen.